2.0 ติดตั้ง LoadBalance RB750GL แบบ 4WAN (Static IP) to 1LAN

วิธีการติดตั้ง และปรับแต่งอุปกรณ์ Mikrotik
ให้รองรับการทำงานที่หลากหลายความต้องการ
การติดตั้ง HotSpot Server, การติดตั้ว Load Balanced ฯลฯ

2.0 ติดตั้ง LoadBalance RB750GL แบบ 4WAN (Static IP) to 1LAN

โพสต์โดย jadeson เมื่อ พุธ 11 ม.ค. 2012 6:46 pm

รูปภาพ 2.0 ติดตั้ง MikroTik RB750GL แบบ 4WAN (Static IP) to 1 LAN - Load Balanced 4 เส้น
บทความสำหรับ: ผู้ที่มีความรู้เกี่ยวกับระบบเครือข่ายในระดับเบื้องต้นถึงปานกลาง (v1.1)
โดย วิทวัส โฉมประเสริฐ, ศุภสิทธิ์ ศิริพานิชกร, เจตน์สันติ์ ยาวิลาศ

คำถาม

ต้องการทำ LoadBalance รวมเน็ตจำนวน 4 เส้น โดยใช้ MikroTik รุ่น RB750GL ต้องทำอย่างไร?

คำตอบ
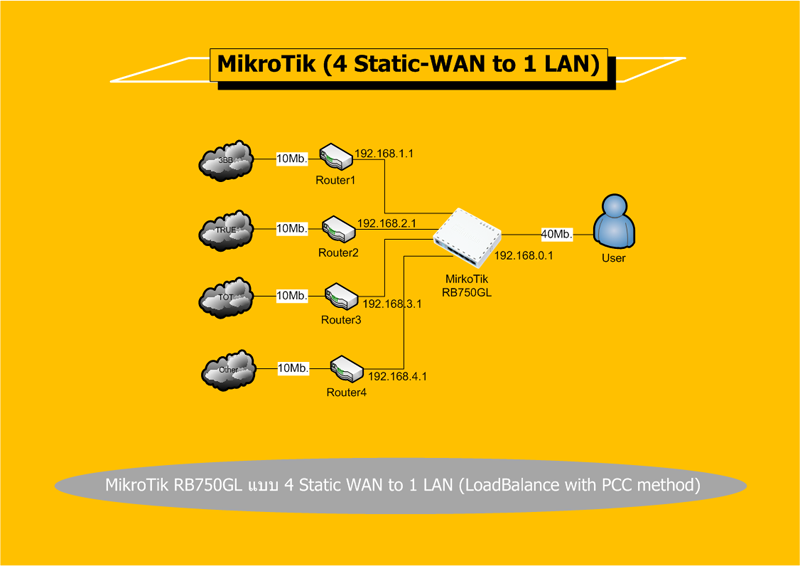


รูปภาพ


วิธีการตั้งค่า LoadBalance RB750GL แบบ 4WAN(Static IP) to 1LAN

  1. ดาวน์โหลด Winbox แล้วเสียบสาย LAN ขา Ether5 ของ MikroTik
    เข้าโปรแกรม Winbox แล้วคลิกเลือก mac address MikroTik ที่ broadcast เจอ แล้วกด Connect

    รูปภาพ


  2. จะมี mac address ของขา LAN (RB750GL) ที่เราเชื่อมต่ออยู่ ขึ้นมา กด Connect เพื่อเชื่อมต่อ

    รูปภาพ


  3. ปกติแล้ว MikroTik แทบทุกรุ่นจะมี config default ให้ แต่เราจะไม่ใช่ครับ กด Remove Configuration ได้เลย

    รูปภาพ


  4. RB750GL จะทำการ Remove config default ออก แล้วจะ reboot ตัวเอง ถ้าเกิด message เด้งขึ้นมา ก็ไม่ต้องตกใจน่ะครับ

    รูปภาพ


  5. ตรวจสอบ Interface ทั้ง5 สังเกตุ ether5 จะมีตัว R แสดงว่าเชื่อมต่ออยู่ มี Tx/Rx วิ่ง

    รูปภาพ


  6. เนื่องด้วยถ้าทำในรูปแบบ Interface นั้นจะต้อง Capture หน้าจอเยอะมาก ผมจึงขอเปลี่ยนไปใช้วิธี code ผ่าน Terminal น่ะครับ
    เข้าเมนู New Terminal > Terminal

    รูปภาพ


  7. คัดลอก code

    โค้ด: เลือกทั้งหมด
    #|/ip address
    /ip address add address=192.168.1.2/24 network=192.168.1.0 broadcast=192.168.1.255 interface=ether1
    /ip address add address=192.168.2.2/24 network=192.168.2.0 broadcast=192.168.2.255 interface=ether2
    /ip address add address=192.168.3.2/24 network=192.168.3.0 broadcast=192.168.3.255 interface=ether3
    /ip address add address=192.168.4.2/24 network=192.168.4.0 broadcast=192.168.4.255 interface=ether4
    /ip address add address=192.168.0.1/24 network=192.168.0.0 broadcast=192.168.0.255 interface=ether5 comment="default configuration"

    #|/ip firewall mangle
    /ip firewall mangle add chain=input in-interface=ether1 action=mark-connection new-connection-mark=ether1_conn
    /ip firewall mangle add chain=input in-interface=ether2 action=mark-connection new-connection-mark=ether2_conn
    /ip firewall mangle add chain=input in-interface=ether3 action=mark-connection new-connection-mark=ether3_conn
    /ip firewall mangle add chain=input in-interface=ether4 action=mark-connection new-connection-mark=ether4_conn

    /ip firewall mangle add chain=output connection-mark=ether1_conn action=mark-routing new-routing-mark=to_ether1
    /ip firewall mangle add chain=output connection-mark=ether2_conn action=mark-routing new-routing-mark=to_ether2
    /ip firewall mangle add chain=output connection-mark=ether3_conn action=mark-routing new-routing-mark=to_ether3
    /ip firewall mangle add chain=output connection-mark=ether4_conn action=mark-routing new-routing-mark=to_ether4

    /ip firewall mangle add chain=prerouting dst-address=192.168.1.0/24 action=accept in-interface=ether5
    /ip firewall mangle add chain=prerouting dst-address=192.168.2.0/24 action=accept in-interface=ether5
    /ip firewall mangle add chain=prerouting dst-address=192.168.3.0/24 action=accept in-interface=ether5
    /ip firewall mangle add chain=prerouting dst-address=192.168.4.0/24 action=accept in-interface=ether5

    /ip firewall mangle add chain=prerouting dst-address-type=!local in-interface=ether5 per-connection-classifier=both-addresses-and-ports:4/0 action=mark-connection new-connection-mark=ether1_conn passthrough=yes
    /ip firewall mangle add chain=prerouting dst-address-type=!local in-interface=ether5 per-connection-classifier=both-addresses-and-ports:4/1 action=mark-connection new-connection-mark=ether2_conn passthrough=yes
    /ip firewall mangle add chain=prerouting dst-address-type=!local in-interface=ether5 per-connection-classifier=both-addresses-and-ports:4/2 action=mark-connection new-connection-mark=ether3_conn passthrough=yes
    /ip firewall mangle add chain=prerouting dst-address-type=!local in-interface=ether5 per-connection-classifier=both-addresses-and-ports:4/3 action=mark-connection new-connection-mark=ether4_conn passthrough=yes
    /ip firewall mangle add chain=prerouting connection-mark=ether1_conn in-interface=ether5 action=mark-routing new-routing-mark=to_ether1
    /ip firewall mangle add chain=prerouting connection-mark=ether2_conn in-interface=ether5 action=mark-routing new-routing-mark=to_ether2
    /ip firewall mangle add chain=prerouting connection-mark=ether3_conn in-interface=ether5 action=mark-routing new-routing-mark=to_ether3
    /ip firewall mangle add chain=prerouting connection-mark=ether4_conn in-interface=ether5 action=mark-routing new-routing-mark=to_ether4

    #|/ip route
    /ip route add dst-address=0.0.0.0/0 gateway=192.168.1.1 routing-mark=to_ether1 check-gateway=ping
    /ip route add dst-address=0.0.0.0/0 gateway=192.168.2.1 routing-mark=to_ether2 check-gateway=ping
    /ip route add dst-address=0.0.0.0/0 gateway=192.168.3.1 routing-mark=to_ether3 check-gateway=ping
    /ip route add dst-address=0.0.0.0/0 gateway=192.168.4.1 routing-mark=to_ether4 check-gateway=ping

    /ip route add dst-address=0.0.0.0/0 gateway=192.168.1.1 distance=1 check-gateway=ping
    /ip route add dst-address=0.0.0.0/0 gateway=192.168.2.1 distance=2 check-gateway=ping
    /ip route add dst-address=0.0.0.0/0 gateway=192.168.3.1 distance=3 check-gateway=ping
    /ip route add dst-address=0.0.0.0/0 gateway=192.168.4.1 distance=4 check-gateway=ping

    #|/ip firewall nat
    /ip firewall nat add chain=srcnat out-interface=ether1 action=masquerade
    /ip firewall nat add chain=srcnat out-interface=ether2 action=masquerade
    /ip firewall nat add chain=srcnat out-interface=ether3 action=masquerade
    /ip firewall nat add chain=srcnat out-interface=ether4 action=masquerade

    #| DHCP server is on switch, with address pool 192.168.0.100-192.168.0.200
    /ip pool add name=default-dhcp ranges=192.168.0.100-192.168.0.200
    /ip dhcp-server add name=default address-pool=default-dhcp interface=ether5 disabled=no
    /ip dhcp-server network add address=192.168.0.0/24 gateway=192.168.0.1 dns-server=192.168.0.1 comment="default configuration"

    #| DNS
    /ip dns set allow-remote-requests=yes
    /ip dns static add name=router address=192.168.0.1

    #| Now Configure DNS server so users can resolve hostnames,
    #| Ex.cache-size=5000KiB
    #| DNS Google = 8.8.8.8,8.8.4.4
    #| DNS 3BB = 110.164.252.222,110.164.252.223
    /ip dns set allow-remote-requests=yes cache-max-ttl=1w cache-size=5000K max-udp-packet-size=512 servers=8.8.8.8,8.8.4.4


    สำหรับกรณีที่ ความเร็ว Internet ไม่เท่ากัน ก็สามารถแก้ไขโค้ดบรรทัดดังนี้ (ตัวอย่าง WAN 1,2,3 ความเร็ว 4Mb และ WAN 4 ความเร็ว 8 Mb)
    (หลักการคือ ในการวน 1 ลูปจะมีกี่ครั้งก็ได้ เพียงพยายามแชร์ Bandwidth ที่จะใช้เท่าๆกัน หรืออาจจะเซตไปบางLink เป็นพิเศษ ตามความต้องการก็ได้ครับ
    - ในตัวอย่าง 1 ลูปมี 5 ครั้ง 4/0 ไปจนถึง 4/4 โดยพยายามเกลี่ย Bandwidth ที่ใช้ให้ออกผ่าน Link ทั้งหมด ให้ใกล้เคียงกัน)

    add chain=prerouting dst-address-type=!local in-interface=Local per-connection-classifier=both-addresses-and-ports:4/0 action=mark-connection new-connection-mark=ether1_conn passthrough=yes
    add chain=prerouting dst-address-type=!local in-interface=Local per-connection-classifier=both-addresses-and-ports:4/1 action=mark-connection new-connection-mark=ether2_conn passthrough=yes
    add chain=prerouting dst-address-type=!local in-interface=Local per-connection-classifier=both-addresses-and-ports:4/2 action=mark-connection new-connection-mark=ether3_conn passthrough=yes
    add chain=prerouting dst-address-type=!local in-interface=Local per-connection-classifier=both-addresses-and-ports:4/3 action=mark-connection new-connection-mark=ether4_conn passthrough=yes
    add chain=prerouting dst-address-type=!local in-interface=Local per-connection-classifier=both-addresses-and-ports:4/4 action=mark-connection new-connection-mark=ether4_conn passthrough=yes

    ผมแนะนำให้คัดลอกโค้ดเก็บไว้เป็น Word เพราะถ้าต้องการเปลี่ยน IP หรือเปลี่ยนค่าอื่นๆ เราสามารถใช้ฟังก์ชั่นค้นหาและแทนที่ ได้เลย

    รูปภาพ
    รูปภาพ


  8. คลิกขวา ที่แถบ command บน terminal แล้ว Paste

    รูปภาพ


  9. รูปแสดงตัวอย่างการป้อนโค้ด
    หลังจากป้อนโค้ดเสร็จแล้วควรสั่ง Reboot ครั้งหนึ่ง ด้วยคำสั่งบน terminal ดังนี้ system reboot

    รูปภาพ


  10. connect เชื่อมต่อใหม่อีกครั้ง (สังเกตุ คราวนี้ IP address จะขึ้นมาเป็น 192.168.0.1 ตามค่าโค้ดที่เราป้อน)

    รูปภาพ


  11. สามารถตรวจสอบการโค้ดต่างๆ ผ่านเมนู Interface ได้เลย

    รูปภาพ


    ปล.

    - ต้องขอโทษด้วยครับ ตอนทดสอบไม่ได้ Capture หน้าจอมาโชว์
    แต่ที่ทดสอบมา ผมมี true 7m กับ 3bb 7m เทสโหลดเต็มสปีด ก็ได้ราวๆ 13m กว่าครับ
    Capture หน้าจอเทสสปีด ขอแก้มือให้ในฟังก์ชั่น 4pppoe to 1 LAN และ 2WAN(static IP)+2pppoe to 1 LAN น่ะครับ :) :)

    - โค้ดที่ให้มานี่อาจจะไม่ดีที่สุด แต่ก็สามารถใช้งานได้ดีระดับหนึ่ง
    ผู้อ่านท่านใดมีคำแนะนำ สามารถแนะนำกันได้ครับ จะได้ช่วยๆกันพัฒนาต่อยอด
    ซึ่งทาง sys2u เราก็จะพยายามหาวิธี ที่จะให้ผู้ใช้ สามารถเซตค่าตัวอุปกรณ์ MikroTik ให้ได้ง่ายกว่านี้ครับ


    ข้อมูลสินค้าแบบมัลติมีเดีย (Multimedia)


    จบบทความ

รายละเอียดการให้บริการจากทีมงาน SYS2U.COM Xpert Zone
SYS2U.COM 24-Hour Online IT Store
ซิสทูยู เฟสบุ๊ค - http://www.facebook.com/SYS2UOnline

ภาพประจำตัวสมาชิก
jadeson
 
โพสต์: 619
ลงทะเบียนเมื่อ: อังคาร 03 ก.พ. 2009 4:50 pm

Re: 2.0 ติดตั้ง LoadBalance RB750GL แบบ 4WAN (Static IP) to 1LAN

โพสต์โดย nirutsawat เมื่อ พฤหัสฯ. 07 มี.ค. 2013 2:20 pm

รบกวน สอบถาม config MikroTik RB450G
แบบ 2WAN (Static IP) to 1LAN พอทำ hotspot แล้วออกเน็ตไม่ได้ (ping ไม่เห็น router)
wan1 ether1 192.168.1.2
wan2 ether 2 192.168.2.2
ether5 192.168.0.1
nirutsawat
 
โพสต์: 5
ลงทะเบียนเมื่อ: อาทิตย์ 03 มี.ค. 2013 7:50 am

Re: 2.0 ติดตั้ง LoadBalance RB750GL แบบ 4WAN (Static IP) to 1LAN

โพสต์โดย jadeson เมื่อ พฤหัสฯ. 07 มี.ค. 2013 3:24 pm

nirutsawat เขียน:รบกวน สอบถาม config MikroTik RB450G
แบบ 2WAN (Static IP) to 1LAN พอทำ hotspot แล้วออกเน็ตไม่ได้ (ping ไม่เห็น router)
wan1 ether1 192.168.1.2
wan2 ether 2 192.168.2.2
ether5 192.168.0.1


ไม่ทราบว่าใช้โค้ดจากด้านบน ใช่ป่าวครับ
ตามโค้ดจะ loadbalance ออก port 5 ถ้าเซต hotspot ออก port 5 อีก จะทำให้ ip ชนกันน่ะครับ

แนะนำถ้าทำ 2 WAN ก็ตัดโค้ด wan3,4 ออก หลังทำ loadbalance เสร็จให้ลองเช็ค port5 ว่าใช้เน็ตได้ไหม รวมเน็ตให้หรือยัง
แล้วจึงค่อยทำ hotspot portที่ว่างครับ
ภาพประจำตัวสมาชิก
jadeson
 
โพสต์: 619
ลงทะเบียนเมื่อ: อังคาร 03 ก.พ. 2009 4:50 pm

Re: 2.0 ติดตั้ง LoadBalance RB750GL แบบ 4WAN (Static IP) to 1LAN

โพสต์โดย nirutsawat เมื่อ พฤหัสฯ. 07 มี.ค. 2013 3:43 pm

ดัดแปลงใช้ code จากด้านบนครับ
ตัด wan3 และ wan4 ออก ตอนไม่เปิด hotspot servers net ออกได้ปกติ
แต่พอทำ hotspot ออกจาก ethe5 เหมือนเบอร์จะชน หรือไม่ก็มองไม่เห็น 192.168.0.1

ถ้าจะทำ hot spot ให้ออกเน็ตได้ ต้อง set อย่างไร?
nirutsawat
 
โพสต์: 5
ลงทะเบียนเมื่อ: อาทิตย์ 03 มี.ค. 2013 7:50 am

Re: 2.0 ติดตั้ง LoadBalance RB750GL แบบ 4WAN (Static IP) to 1LAN

โพสต์โดย jadeson เมื่อ พฤหัสฯ. 07 มี.ค. 2013 4:58 pm

nirutsawat เขียน:ดัดแปลงใช้ code จากด้านบนครับ
ตัด wan3 และ wan4 ออก ตอนไม่เปิด hotspot servers net ออกได้ปกติ
แต่พอทำ hotspot ออกจาก ethe5 เหมือนเบอร์จะชน หรือไม่ก็มองไม่เห็น 192.168.0.1

ถ้าจะทำ hot spot ให้ออกเน็ตได้ ต้อง set อย่างไร?


ให้สร้าง hotspot ที่ port 3,4 ครับ และ ip ก็ควรเป็นคนละวงกับที่ port 5 แจกอยู่
SYS2U.COM 24-Hour Online IT Store
ซิสทูยู เฟสบุ๊ค - http://www.facebook.com/SYS2UOnline

ภาพประจำตัวสมาชิก
jadeson
 
โพสต์: 619
ลงทะเบียนเมื่อ: อังคาร 03 ก.พ. 2009 4:50 pm

Re: 2.0 ติดตั้ง LoadBalance RB750GL แบบ 4WAN (Static IP) to 1LAN

โพสต์โดย nirutsawat เมื่อ ศุกร์ 08 มี.ค. 2013 10:38 am

จากบอร์ด ที่ว่า
สำหรับกรณีที่ ความเร็ว Internet ไม่เท่ากัน ก็สามารถแก้ไขโค้ดบรรทัดดังนี้ (ตัวอย่าง WAN 1,2,3 ความเร็ว 4Mb และ WAN 4 ความเร็ว 8 Mb)
(หลักการคือ ในการวน 1 ลูปจะมีกี่ครั้งก็ได้ เพียงพยายามแชร์ Bandwidth ที่จะใช้เท่าๆกัน หรืออาจจะเซตไปบางLink เป็นพิเศษ ตามความต้องการก็ได้ครับ
- ในตัวอย่าง 1 ลูปมี 5 ครั้ง 4/0 ไปจนถึง 4/4 โดยพยายามเกลี่ย Bandwidth ที่ใช้ให้ออกผ่าน Link ทั้งหมด ให้ใกล้เคียงกัน)

add chain=prerouting dst-address-type=!local in-interface=Local per-connection-classifier=both-addresses-and-ports:4/0 action=mark-connection new-connection-mark=ether1_conn passthrough=yes
add chain=prerouting dst-address-type=!local in-interface=Local per-connection-classifier=both-addresses-and-ports:4/1 action=mark-connection new-connection-mark=ether2_conn passthrough=yes
add chain=prerouting dst-address-type=!local in-interface=Local per-connection-classifier=both-addresses-and-ports:4/2 action=mark-connection new-connection-mark=ether3_conn passthrough=yes
add chain=prerouting dst-address-type=!local in-interface=Local per-connection-classifier=both-addresses-and-ports:4/3 action=mark-connection new-connection-mark=ether4_conn passthrough=yes
add chain=prerouting dst-address-type=!local in-interface=Local per-connection-classifier=both-addresses-and-ports:4/4 action=mark-connection new-connection-mark=ether4_conn passthrough=yes

กรณี มี 2wan โดย wan1=10Mb และ wan2=30Mb
แล้วไม่ใส่ config ตามข้างบน เน็ตวิ่งออกเส้นไหน? และทดสอบความเร็วน่าจะเป็นยังงัยครับ


และถ้าเพิ่ม config ตามนี้ การวิ่งออกเน็ต จะเริ่มวิ่งวนลูป ตามลำดับทุกครั้งมั้ยครับ?
add chain=prerouting dst-address-type=!local in-interface=Local per-connection-classifier=both-addresses-and-ports:3/0 action=mark-connection new-connection-mark=ether1_conn passthrough=yes
add chain=prerouting dst-address-type=!local in-interface=Local per-connection-classifier=both-addresses-and-ports:3/1 action=mark-connection new-connection-mark=ether2_conn passthrough=yes
add chain=prerouting dst-address-type=!local in-interface=Local per-connection-classifier=both-addresses-and-ports:3/2 action=mark-connection new-connection-mark=ether2_conn passthrough=yes
add chain=prerouting dst-address-type=!local in-interface=Local per-connection-classifier=both-addresses-and-ports:3/3 action=mark-connection new-connection-mark=ether2_conn passthrough=yes
nirutsawat
 
โพสต์: 5
ลงทะเบียนเมื่อ: อาทิตย์ 03 มี.ค. 2013 7:50 am

Re: 2.0 ติดตั้ง LoadBalance RB750GL แบบ 4WAN (Static IP) to 1LAN

โพสต์โดย thawatchai30 เมื่อ เสาร์ 26 เม.ย. 2014 9:00 am

รบกวนสอบถามทีมงานsys2uครับคือผมต้องการฝช้แค่ 2wan(static) 1 lan Wan1 3bb 30M และ wan2 True 20M โค๊ดด้านล่างนี้ถูกหรือเปล่าครับ
โค้ด: เลือกทั้งหมด
#|/ip firewall mangle
/ip firewall mangle add chain=input in-interface=ether1 action=mark-connection new-connection-mark=ether1_conn
/ip firewall mangle add chain=input in-interface=ether2 action=mark-connection new-connection-mark=ether2_conn


/ip firewall mangle add chain=output connection-mark=ether1_conn action=mark-routing new-routing-mark=to_ether1
/ip firewall mangle add chain=output connection-mark=ether2_conn action=mark-routing new-routing-mark=to_ether2


/ip firewall mangle add chain=prerouting dst-address=192.168.1.0/24 action=accept in-interface=ether5
/ip firewall mangle add chain=prerouting dst-address=192.168.2.0/24 action=accept in-interface=ether5


/ip firewall mangle add chain=prerouting dst-address-type=!local in-interface=ether5 per-connection-classifier=both-addresses-and-ports:5/0 action=mark-connection new-connection-mark=ether1_conn passthrough=yes
/ip firewall mangle add chain=prerouting dst-address-type=!local in-interface=ether5 per-connection-classifier=both-addresses-and-ports:5/1 action=mark-connection new-connection-mark=ether1_conn passthrough=yes
/ip firewall mangle add chain=prerouting dst-address-type=!local in-interface=ether5 per-connection-classifier=both-addresses-and-ports:5/2 action=mark-connection new-connection-mark=ether1_conn passthrough=yes
/ip firewall mangle add chain=prerouting dst-address-type=!local in-interface=ether5 per-connection-classifier=both-addresses-and-ports:5/3 action=mark-connection new-connection-mark=ether2_conn passthrough=yes
/ip firewall mangle add chain=prerouting dst-address-type=!local in-interface=ether5 per-connection-classifier=both-addresses-and-ports:5/4 action=mark-connection new-connection-mark=ether2_conn passthrough=yes

/ip firewall mangle add chain=prerouting connection-mark=ether1_conn in-interface=ether5 action=mark-routing new-routing-mark=to_ether1
/ip firewall mangle add chain=prerouting connection-mark=ether2_conn in-interface=ether5 action=mark-routing new-routing-mark=to_ether2


#|/ip route
/ip route add dst-address=0.0.0.0/0 gateway=192.168.1.1 routing-mark=to_ether1 check-gateway=ping
/ip route add dst-address=0.0.0.0/0 gateway=192.168.2.1 routing-mark=to_ether2 check-gateway=ping


/ip route add dst-address=0.0.0.0/0 gateway=192.168.1.1 distance=1 check-gateway=ping
/ip route add dst-address=0.0.0.0/0 gateway=192.168.2.1 distance=2 check-gateway=ping


#|/ip firewall nat
/ip firewall nat add chain=srcnat out-interface=ether1 action=masquerade
/ip firewall nat add chain=srcnat out-interface=ether2 action=masquerade
/ip firewall nat add chain=srcnat out-interface=ether3 action=masquerade
/ip firewall nat add chain=srcnat out-interface=ether4 action=masquerade

#| DHCP server is on switch, with address pool 192.168.0.100-192.168.0.200
/ip pool add name=default-dhcp ranges=192.168.0.100-192.168.0.200
/ip dhcp-server add name=default address-pool=default-dhcp interface=ether5 disabled=no
/ip dhcp-server network add address=192.168.0.0/24 gateway=192.168.0.1 dns-server=192.168.0.1 comment="default configuration"

#| DNS
/ip dns set allow-remote-requests=yes
/ip dns static add name=router address=192.168.0.1

#| Now Configure DNS server so users can resolve hostnames,
#| Ex.cache-size=5000KiB
#| DNS Google = 8.8.8.8,8.8.4.4
#| DNS 3BB = 110.164.252.222,110.164.252.223
/ip dns set allow-remote-requests=yes cache-max-ttl=1w cache-size=5000K max-udp-packet-size=512 servers=8.8.8.8,8.8.4.4

-ถ้าเผื่อผมต้องการทำ port ether3,ether4 ให้เป็นlan ด้วยต้องเพิ่มคำสั่งยังไงบ้างครับ
-สคริปนี้ใช้กับ rb450g ได้ไหมครับ
-และถ้าผมต้องการปรับโหมดเป็น link backup แทนการ loadblance ต้องปรับตรงไหนอีกครับ
-จำนวนลูป เยอะ หรือน้อยมีผลอะไรบ้างครับ

ขอบคุณพี่ๆทีมงานsys2uทุกคนนะครับ
thawatchai30
 
โพสต์: 20
ลงทะเบียนเมื่อ: ศุกร์ 21 ต.ค. 2011 3:25 am

Re: 2.0 ติดตั้ง LoadBalance RB750GL แบบ 4WAN (Static IP) to 1LAN

โพสต์โดย jadeson เมื่อ จันทร์ 28 เม.ย. 2014 8:18 am

thawatchai30 เขียน:รบกวนสอบถามทีมงานsys2uครับคือผมต้องการฝช้แค่ 2wan(static) 1 lan Wan1 3bb 30M และ wan2 True 20M โค๊ดด้านล่างนี้ถูกหรือเปล่าครับ
โค้ด: เลือกทั้งหมด
#|/ip firewall mangle
/ip firewall mangle add chain=input in-interface=ether1 action=mark-connection new-connection-mark=ether1_conn
/ip firewall mangle add chain=input in-interface=ether2 action=mark-connection new-connection-mark=ether2_conn


/ip firewall mangle add chain=output connection-mark=ether1_conn action=mark-routing new-routing-mark=to_ether1
/ip firewall mangle add chain=output connection-mark=ether2_conn action=mark-routing new-routing-mark=to_ether2


/ip firewall mangle add chain=prerouting dst-address=192.168.1.0/24 action=accept in-interface=ether5
/ip firewall mangle add chain=prerouting dst-address=192.168.2.0/24 action=accept in-interface=ether5


/ip firewall mangle add chain=prerouting dst-address-type=!local in-interface=ether5 per-connection-classifier=both-addresses-and-ports:5/0 action=mark-connection new-connection-mark=ether1_conn passthrough=yes
/ip firewall mangle add chain=prerouting dst-address-type=!local in-interface=ether5 per-connection-classifier=both-addresses-and-ports:5/1 action=mark-connection new-connection-mark=ether1_conn passthrough=yes
/ip firewall mangle add chain=prerouting dst-address-type=!local in-interface=ether5 per-connection-classifier=both-addresses-and-ports:5/2 action=mark-connection new-connection-mark=ether1_conn passthrough=yes
/ip firewall mangle add chain=prerouting dst-address-type=!local in-interface=ether5 per-connection-classifier=both-addresses-and-ports:5/3 action=mark-connection new-connection-mark=ether2_conn passthrough=yes
/ip firewall mangle add chain=prerouting dst-address-type=!local in-interface=ether5 per-connection-classifier=both-addresses-and-ports:5/4 action=mark-connection new-connection-mark=ether2_conn passthrough=yes

/ip firewall mangle add chain=prerouting connection-mark=ether1_conn in-interface=ether5 action=mark-routing new-routing-mark=to_ether1
/ip firewall mangle add chain=prerouting connection-mark=ether2_conn in-interface=ether5 action=mark-routing new-routing-mark=to_ether2


#|/ip route
/ip route add dst-address=0.0.0.0/0 gateway=192.168.1.1 routing-mark=to_ether1 check-gateway=ping
/ip route add dst-address=0.0.0.0/0 gateway=192.168.2.1 routing-mark=to_ether2 check-gateway=ping


/ip route add dst-address=0.0.0.0/0 gateway=192.168.1.1 distance=1 check-gateway=ping
/ip route add dst-address=0.0.0.0/0 gateway=192.168.2.1 distance=2 check-gateway=ping


#|/ip firewall nat
/ip firewall nat add chain=srcnat out-interface=ether1 action=masquerade
/ip firewall nat add chain=srcnat out-interface=ether2 action=masquerade
/ip firewall nat add chain=srcnat out-interface=ether3 action=masquerade
/ip firewall nat add chain=srcnat out-interface=ether4 action=masquerade

#| DHCP server is on switch, with address pool 192.168.0.100-192.168.0.200
/ip pool add name=default-dhcp ranges=192.168.0.100-192.168.0.200
/ip dhcp-server add name=default address-pool=default-dhcp interface=ether5 disabled=no
/ip dhcp-server network add address=192.168.0.0/24 gateway=192.168.0.1 dns-server=192.168.0.1 comment="default configuration"

#| DNS
/ip dns set allow-remote-requests=yes
/ip dns static add name=router address=192.168.0.1

#| Now Configure DNS server so users can resolve hostnames,
#| Ex.cache-size=5000KiB
#| DNS Google = 8.8.8.8,8.8.4.4
#| DNS 3BB = 110.164.252.222,110.164.252.223
/ip dns set allow-remote-requests=yes cache-max-ttl=1w cache-size=5000K max-udp-packet-size=512 servers=8.8.8.8,8.8.4.4

-ถ้าเผื่อผมต้องการทำ port ether3,ether4 ให้เป็นlan ด้วยต้องเพิ่มคำสั่งยังไงบ้างครับ
-สคริปนี้ใช้กับ rb450g ได้ไหมครับ
-และถ้าผมต้องการปรับโหมดเป็น link backup แทนการ loadblance ต้องปรับตรงไหนอีกครับ
-จำนวนลูป เยอะ หรือน้อยมีผลอะไรบ้างครับ

ขอบคุณพี่ๆทีมงานsys2uทุกคนนะครับ


มีทำตัวอย่าง Static + PPPoE ให้แล้วครับ (ตัวอย่างมีอย่างละ2 ก็ให้ตัดเหลือ ตามขา wan ของเรา)
ตามกระทู้นี้ 2.2 ติดตั้ง LoadBalance RB750GL 2 PPPOE+2 Static IP to 1 LAN
*แนะนำให้เอาขา WAN ที่เป็น PPPoE ขึ้นเป็นลำดับแรก เพราะ Mikrotik สามารถควบคุมการทำงานได้ดีกว่า

-ถ้าเผื่อผมต้องการทำ port ether3,ether4 ให้เป็นlan ด้วยต้องเพิ่มคำสั่งยังไงบ้างครับ
-- ปรับ master port ของ ether3 และ ether4 ให้เป็น ether 5 ได้เลยครับ ตามตัวอย่าง lan ของ loadbalace เซตให้ออกขา 5 ให้แล้ว

-สคริปนี้ใช้กับ rb450g ได้ไหมครับ
-- ใช้ได้ทุกรุ่นครับ ปกติ Mikrotik แต่ละรุ่นที่ต่างกันจะเป็นเฉพาะในส่วนของสเป็กอุปกรณ์ และ license แต่การโค้ดและคำสั่ง ใช้เหมือนกันเลยครับ

-และถ้าผมต้องการปรับโหมดเป็น link backup แทนการ loadblance ต้องปรับตรงไหนอีกครับ
-- เป็น link backup ให้อัตโนมัติอยู่แล้วครับ link ไหนดาวน์ จะสลับไปให้อัตโนมัติ

-จำนวนลูป เยอะ หรือน้อยมีผลอะไรบ้างครับ
-- ไม่จำเป็นครับ เป็นเหมือนลูปกำหนดปริมาณการไหลของข้อมูลว่าต้องการให้ออก WAN ไหนในอัตราส่วนเท่าไรแค่นั้นครับ อาทิ
packet มา 4 ให้ WAN 1 ให้ออก 2 packet และ WAN 2 ให้ออก 2 packet (WAN1-50% ,WAN2-50%) หรือ
packet มา 4 ให้ WAN 1 ให้ออก 3 packet และ WAN 2 ให้ออก 1 packet (WAN1-75% ,WAN2-25%) เป็นต้น
SYS2U.COM 24-Hour Online IT Store
ซิสทูยู เฟสบุ๊ค - http://www.facebook.com/SYS2UOnline

ภาพประจำตัวสมาชิก
jadeson
 
โพสต์: 619
ลงทะเบียนเมื่อ: อังคาร 03 ก.พ. 2009 4:50 pm


ย้อนกลับไปยัง วิธีการติดตั้งและปรับแต่งอุปกรณ์ Mikrotik

ผู้ใช้งานขณะนี้

กำลังดูบอร์ดนี้: ไม่มีสมาชิกใหม่ และ บุคคลทั่วไป 2 ท่าน